

Over the next few minutes, we’ll look at exactly what’s gone wrong, why it’s gone wrong, and how to fix it. But first, just as a quick recap, here’s how WordPress and ClickFunnels can work well;l together.
Are There Genuinely Free Alternatives to ClickFunnels? (Yes There Are!)
Table of Contents
Why Integrate ClickFunnels with WordPress?

ClickFunnels and WordPress working together is a great setup! If you have a website or blog that you’ve built in WordPress, using the plugin will give you all the power of a ClickFunnnels sales funnel, whilst still keeping your own domain and custom URLs.
Perhaps you’re already using WordPress, but haven’t yet taken out a subscription with ClickFunnels. In that case, we can assure you that the two function together perfectly. In fact, if you visit the official blog, you’ll see that ClickFunnels themselves have chosen to host their own pages on WordPress. And if it’s good enough for ClickFunnels…
ClickFunnels is an awesome funnel builder, with a user base of over 127,000 digital marketers. Although no official figures exist, it’s estimated that over 80% of users are hosting their web pages on WordPress, whilst using ClickFunnels to collect qualified leads and direct them to your landing page.
Find Out How to Promote ClickFunnels
ClickFunnels WordPress Plugin Not Working? Here are a Few Reasons Why
As we said in our introduction above, the ClickFunnels WordPress plugin can develop some glitches on occasion. However, most of these are well-documented, so it’s not that difficult to find a fix. We’d hate for you to decide against ClickFunnels based on the performance of one plugin, so read on for some common problems and the ways to solve them.
You Haven’t Installed or Activated the Plugin
This might sound like the plugin version of “have you tried switching it off and on again”, but it’s not unknown for new users to miss this step! To make sure it’s been installed properly, just follow these simple steps:
- Open up your WordPress admin panel.
- Go to ‘Plugins’ and then ‘Installed Plugins’
- Next to the icon for the ClickFunnels plugin, make sure it says ‘installed’.
- If it’s already installed – great. If not, just click the ‘Install’ button.
(Hint: It’s never a bad idea to try the install again, just in case a file became corrupted the first time around.)
One important thing to mention here is that you need to check you’re installing the correct plugin! There are quite a few plugins that mention the words ‘ClickFunnels’ and ‘WordPress’ in the title, so double-check that you’re installing the right one! It should just say ‘ClickFunnels’, without any other words.
You’re Running an Outdated Plugin
We shouldn’t need to tell you this (!), but it’s important to make sure you’re running the latest version of every plugin. And, of course, the latest versions of WordPress and ClickFunnels. That being said, the plugin hasn’t received an update in over three years so it’s very unlikely that there’ll be an update waiting for you to install. But keep checking! After all, you never know…
Failed API (Application Programming Interface)
This is the most common reason for the ClickFunnels WordPress Plugin to fail. Once you’ve built out your sales funnel in ClickFunnels, you’ll need to make sure the API is installed properly, otherwise, WordPress won’t be able to pull your sales funnel pages from ClickFunnels.
Now we all know that ClickFunnels is great for users with no design or coding experience, but installing the API correctly takes a bit of a techie mindset. It’s very common for users to miss a step, or to select the wrong interface settings.
The quick fix here is to run the compatibility test which comes as part of the ClickFunnels plugin. To do this, follow the following steps:
From within WordPress, find the ClickFunnels plugin settings screen. This is usually available by clicking one of the menu tabs along the left-hand side of the WordPress home screen, but your layout might be different. The page should look something like this:
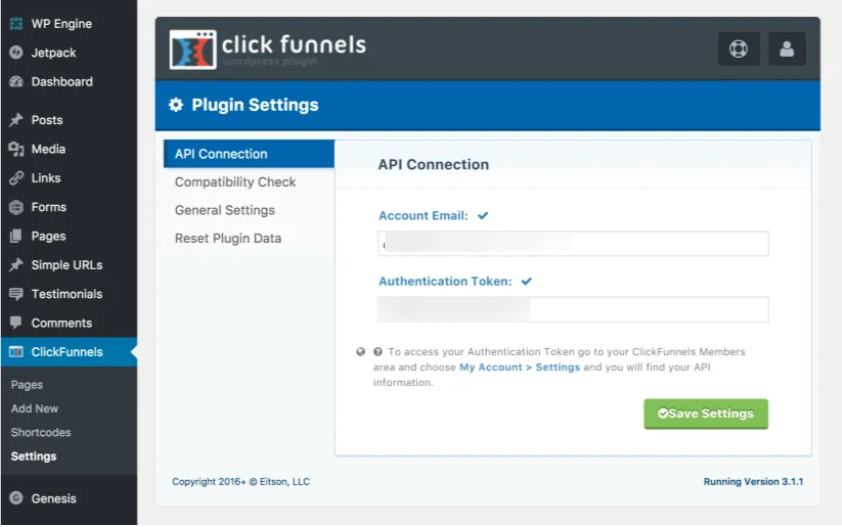
Selecting the first menu – API Connection – should show a tick against the input boxes for Account Email and Authentication Token. If one of these ticks are missing, you have an incorrect install of the API and you’ll need to follow the install details from scratch (but there’s no need to go back to the manual, we’ve listed these steps below).
Next, you need to click the second menu option, which is titled ‘Compatibility Check’. This will show a window similar to this:
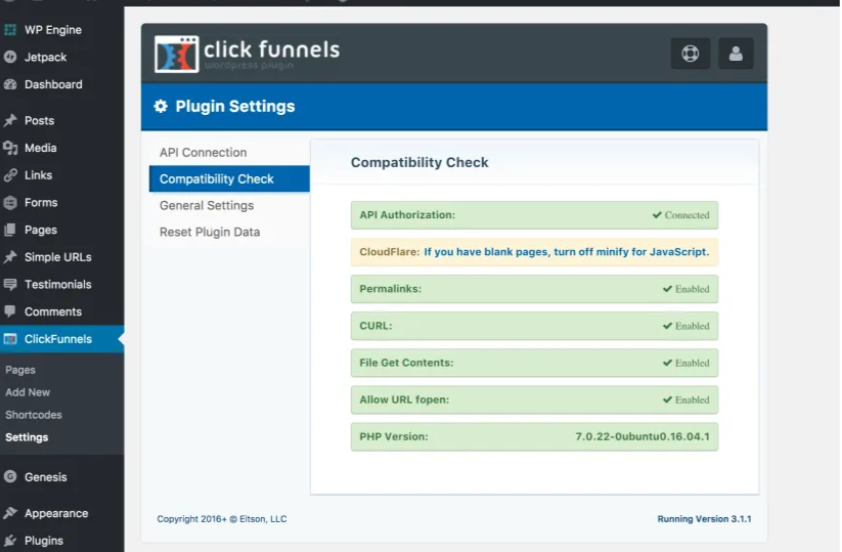
The most important thing here is that all the boxes are green. Once again, if you have an error showing here, or one of the boxes isn’t ticked, you’ll need to do a fresh install.
Incorrect domain settings
If you have all your content on WordPress, which most users do, then you probably want to make sure your funnels in ClickFunnels are on the same domain, so that the URL of the funnel pages re-affirms your web identity.
Buty if you intend to set a funnel to connect to WordPress using this method, it’s important that you don’t add your custom domain to that funnel in ClickFunnels. The funnel that you’re attaching to WordPress must remain on your ClickFunnels subdomain, not on the domain you use for WordPress.
Your AdBlocker Might Be Incompatible
It seems unlikely, but Certain ad blockers can prevent the plugin from connecting properly. If you’re still having trouble with your ClickFunnels WordPress plugin, then try disabling your ad blocker in WordPress. If that solves the problem then it instantly creates another problem, which is loads of pesky ads popping up all the time! But at least you’ve solved the problem, although you may need to find alternative adblocking software.
Your Email Address Might be the Problem!
We’ve no idea why this should ever be an issue, and we’ve never heard of it happening, but ClickFunnels tech support tells us that if your email address contains contains “+” or “_” symbols, it may interfere with the connection. We’ve no idea how to fix this, other than to suggest creating a brand new email address and trying that one out. Of course, this can only ever be a temporary fix, and you’ll probably need to raise a ticket with tech support if this does turn out to be the problem.
Conflicts With Other Plugins
Nobody likes to see this as a possible root of their problems, because uninstalling all your plugins is laborious, and usually unnecessary. But plugin conflict can be a problem, and if you’ve tried all our other fixes then it just might be worth the time. (And, in our experience, it’s the first thing a tech support person will ask – knowing full well that you haven’t tried it, thus giving them an excuse to end the call.)
What to Do if You’ve Tried Everything Else

In most of the cases we’ve heard about – and there have been a few – the fixes we’ve posted above will solve the problem. But if all else fails, you’ll need to raise a ticket with tech support.
With third-party plugins, this can open a real can of worms! The plugin developer (in this case, ClickFunnels) will likely blame WordPress, and WordPress will likely blame the plugin! But in this case, the responsibility is clear: ClickFunnels own the plugin, and so it’s the ClickFunnels support team that need to sort it out.
How To Find and Install Your API Key
As we promised at the top of the page, here are the instructions for finding and installing your API. Some people panic at this stage because, as we’ve said before, it can seem a bit too technical. But if you just follow each step carefully, the API interface will install perfectly.
- Log in to your ClickFunnels account, and hover your mouse over the menu icon in the top right corner (this will be your photo if you’ve set this up in your profile).
- A drop-down menu should appear, and you’ll need to select ‘Account Details’
- Towards the bottom of the page that’s now opened, there’s an option that says ‘WordPress API’ and, in line with this, you should see a button that says ‘Expand’ At the bottom of the accounts details page, you will now see an option for WordPress API, to the right of this, you will see an ‘Expand’ button.
- Clicking the ‘Expand’ button will reveal your API key, which you need to copy. (It’s best to paste it into a blank document, just in case the Copy/Paste clipboard fails to store the key.)
- Next, log into your WordPress site and, from the right-hand side menu, select ‘ClickFunnels’ and then ‘Settings’
- You’ll be asked for your ClickFunnels account email, which you need to type in the top box.
- In the second box, you should now paste your API Key. Confusingly, ClickFunnels refers to this as the ‘authentication token’, but it’s the same thing.
- That’s it!
Want to Make Money With ClickFunnels? Find Out
How to Avoid Issues in the Future

To avoid issues with your plugin in the future, simply carry out a regular maintenance routine. Here are a few tips when doing this:
- Check for updates to your plugins on a regular basis. We’ve set a monthly alarm in Gmail, which reminds us to check (because sometimes the plugin won’t notify us of an update).
- Update and backup your WordPress site regularly. Sometimes data can become corrupt and cause the plugin to crash, so being able to restore WordPress to an earlier instance is a good thing!
- Ensure you are running within the required memory. WordPress limits its memory allocation based on available memory. If the memory is set too low, you can either edit the php.ini file (dangerous!) or ask a techie friend to do it for you (better!)
Want to Improve your Website’s SEO? Check Out 5 Best Yoast Alternatives
In Conclusion
ClickFunnels and WordPress work together really well and, although the plugin can sometimes behave badly, it’s usually easy to solve whatever’s causing the problem.
We hope that we’ve helped you understand why problems sometimes happen, and how you can fix them. If we’ve helped you in any way, we’d love it if you’d let us know by sending us a quick message.
So, problem solved, system back up and running: go make some money!


